Archive | Android RSS feed for this section

Android Toast Notification Example

16 Sep

In Android, Toast is a notification message that pop up, display a certain amount of time, and automtaically fades in and out, most people just use it for debugging purpose.

Code snippets to create a Toast message :

//display in short period of time
Toast.makeText(getApplicationContext(), “msg msg”, Toast.LENGTH_SHORT).show();

//display in long period of time
Toast.makeText(getApplicationContext(), “msg msg”, Toast.LENGTH_LONG).show();
In this tutorial, we will show you two Toast examples :

Normal Toast view.
Custom Toast view.
P.S This project is developed in Eclipse 3.7, and tested with Android 2.3.3.

1. Normal Toast View
Simple Toast example.

File : res/layout/main.xml

File : MainActivity.java

package com.ms.android;

import android.app.Activity;
import android.os.Bundle;
import android.view.View;
import android.view.View.OnClickListener;
import android.widget.Button;
import android.widget.Toast;

public class MainActivity extends Activity {

private Button button;

public void onCreate(Bundle savedInstanceState) {

super.onCreate(savedInstanceState);
setContentView(R.layout.main);

button = (Button) findViewById(R.id.buttonToast);

button.setOnClickListener(new OnClickListener() {

@Override
public void onClick(View arg0) {

Toast.makeText(getApplicationContext(),
“Button is clicked”, Toast.LENGTH_LONG).show();

}
});
}
}
See demo, when a button is clicked, display a normal Toast message.

Notifications in Android

16 Sep
We have seen Activities and Intents. Now we need to move on to services. However, since services mostly interact with a user through notifications, I felt the need to introduce a simple program to deal with Notifications.
What are Notifications? The name itself implies their functionality. They are a way of alerting a user about an event that he needs to be informed about or even take some action on getting that information.
Notification on Android can be done in any of the following ways:
  • ·         Status Bar Notification
  • ·         Vibrate
  • ·         Flash lights
  • ·         Play a sound
From the Notification, you can allow the user to launch a new activity as well. Now we will look at status bar notification as this can be easily tested on the emulator.
To create a status bar notification, you will need to use two classes: Notification andNotificationManager.
  • ·         Notification – defines the properties of the status bar notification like the icon to display, the test to display when the notification first appears on the status bar and the time to display.
  • ·         NotificationManager is an android system service that executes and manages all notifications. Hence you cannot create an instance of the NotificationManager but you can retrieve a reference to it by calling the getSystemService() method.
Once you procure this handle, you invoke the notify() method on it by passing the notification object created.
So far, you have all the information to display on the status bar. However, when the user clicks the notification icon on the status bar, what detailed information should you show the user? This is yet to be created. This is done by calling the method setLatestEventInfo() on the notification object. What needs to be passed to this method, we will see with an example.
You can download the code for a very simple Notification example here:
The code is explained below:
Step 1: Procure a handle to the NotificationManager:
            private NotificationManager mNotificationManager;
      …

mNotificationManager =
      (NotificationManager)getSystemService(NOTIFICATION_SERVICE);

Step 2: Create a notification object along with properties to display on the status bar
 
final Notification notifyDetails =
new Notification(R.drawable.android,”New Alert, Click Me!”,System.currentTimeMillis());
Step 3: Add the details that need to get displayed when the user clicks on the notification. In this case, I have created an intent to invoke the browser to show the website http://www.android.com

Context context = getApplicationContext();
CharSequence contentTitle = "Notification Details...";
CharSequence contentText = "Browse Android Official Site by clicking me";
Intent notifyIntent = newIntent(android.content.Intent.ACTION_VIEW,Uri.parse("http://www.android.com"));
PendingIntent intent =
      PendingIntent.getActivity(SimpleNotification.this, 0,
      notifyIntent, android.content.Intent.FLAG_ACTIVITY_NEW_TASK);
notifyDetails.setLatestEventInfo(context, contentTitle, contentText, intent);
Step 4: Now the stage is set. Notify.
      mNotificationManager.notify(SIMPLE_NOTFICATION_ID, notifyDetails);

Note that all of the above actions(except getting a handle to the NotificationManager) are done on the click of a button “Start Notification”. So all the details go into the setOnClickListener() method of the button.
Similarly, the notification, for the example sake is stopped by clicking a cancel notification button. And the code there is :

mNotificationManager.cancel(SIMPLE_NOTFICATION_ID);

Now, you may realize that the constant SIMPLE_NOTIFICATION_ID becomes the way of controlling, updating, stopping a current notification that is started with the same ID.
For more options like canceling the notification once the user clicks on the notification or to ensure that it does not get cleared on clicking the “Clear notifications” button, please see the android reference documentation.

Background image in Android

16 Sep

For one of the apps I’m working on I wanted to have a nice pixel pattern tiled behind my widgets.
After a little bit of hunting around I found this tutorial, and I thought I’d clean up the lessons within and show you how.

Here’s the contents of my main.xml layout file,

<?xml version="1.0" encoding="utf-8"?>
<LinearLayout xmlns:android="http://schemas.android.com/apk/res/android"
    android:orientation="vertical"
    android:layout_width="fill_parent"
    android:layout_height="fill_parent"
    android:background="@drawable/backrepeat"
    android:gravity="center_horizontal"
    >
<TextView  
    android:layout_width="fill_parent" 
    android:layout_height="wrap_content" 
    android:text="@string/hello"
    />  
</LinearLayout>

which is referenced in code in the standard way like this:


@Override
public void onCreate(Bundle savedInstanceState) {
super.onCreate(savedInstanceState);
setContentView(R.layout.main);

...// (rest of onCreate method continues here..)

Now note this line:

android:background="@drawable/backrepeat"

What’s going on there?
.. Glad you asked!

Here’s a quick screenshot of the contents of one of my drawable folders in my project:

What is this
backrepeat.xml?

Well, here’s the contents of that file here:

<bitmap
xmlns:android="http://schemas.android.com/apk/res/android"
android:src="@drawable/scale1"
android:tileMode="repeat"
android:dither="true" />

Can you see what’s going on?
Backrepeat.xml defines an instance of the BitmapDrawable class, and that class references our simple scale1.jpg, located in the drawable-hdpi folder.

Simply by adding the:

<bitmap
    xmlns:android="http://schemas.android.com/apk/res/android"
    android:src="@drawable/scale1"
    android:tileMode="repeat"
    android:dither="true" />

line in bold, we are able to achieve results such as this:


Easy isn’t it?

One thing to keep in mind is that you should have folders drawable-hdpi, drawable-mdpi & drawable-ldpi, you’ll need to add this backrepeat.xml file and the relevant images to each of these to allow this functionality in high, medium and low dpi (dots per inch) screen sizes.

ANDROID APPLICATION ARCHITECTURE

16 Sep

The Components and settings of an Android application are described in the AndroidManifest.xml file. It should also contain the permissions for the application.

<?xml version="1.0" encoding="utf-8"?>
<manifest xmlns:android="http://schemas.android.com/apk/res/android"
      package="de.vogella.android.temperature"
      android:versionCode="1"
      android:versionName="1.0">
    <application android:icon="@drawable/icon" android:label="@string/app_name">
        <activity android:name=".Convert"
                  android:label="@string/app_name">
            <intent-filter>
                <action android:name="android.intent.action.MAIN" />
                <category android:name="android.intent.category.LAUNCHER" />
            </intent-filter>
        </activity>

    </application>
    <uses-sdk android:minSdkVersion="9" />

</manifest>

The Package attribute defines the base package for the java objects referred to in file. If a Java object lies within a different package. It must be declared with the full qualified package name Google Play requires that every Android Application has it own unique package. Hence, it is good to use reverser domain name as package name. It will avoid confusions and Collisions with other applications. android:versionName and android:versionCode specify the version of your application version name is what the user sees and can be an integer. The Android Market determination is based on the version code. You start with “1” if you need it do perform an update of existing installations and increase the “1” value by one if you roll-out a new version of your application.

The <activity> tag defines an Activity in this example pointing to convert class in the com.example package. Intent filter is registered for this.

R.Java and Resource

The gen directory is an Android project contains the generated values R.jave is a generated class that contains references to certain resources of the project resources must be defined in the “res” directory and can be XML files icons or pictures.

If you are creating new resources the reference is automatically created in R.Jave via the Eclipse ADT tools. These are static integer values and define IDs for the resources. In order to access the corresponding resource via these IDs the Android System provides methods.

R.Java is automatically created by the Eclipse development environment manual changes are not necessary and will be overridden by the tooling.

Assets

The “assets” directory can be used to store any kind of data while the “res” directory contains structured values which are known to the Android platform. You can access this data via the “Assets Manager” through which you can access the “get Assets” method.

// Get the AssetManager
AssetManager manager = getAssets();

// Read a Bitmap from Assets
try {
InputStream open = manager.open("logo.png");
Bitmap bitmap = BitmapFactory.decodeStream(open);
// Assign the bitmap to an ImageView in this layout
ImageView view = (ImageView) findViewById(R.id.imageView1);
view.setImageBitmap(bitmap);
} catch (IOException e) {
e.printStackTrace();
}

 Activities and Layouts

Via “Layouts” the user interface for “Activities” is defined. The layout defines the included “Views” (Widgets) and it properties.

A Layout can be defined either through java code or through XML. Most of the since it is defined in XML file only. The Layouts are defined via resource file in the /res/layout folder. This specifies he  “View Groups”, Views, for this layout.

To access a View through Java Code, you have to give it a unique ID via the “android:id” attribute. To assign a new ID to a “view” use @+id/yourvalue .

<Button
	android:id="@+id/button1"
	android:layout_width="wrap_content"
	android:layout_height="wrap_content"
	android:text="Show Preferences" >
</Button>

Layouts are defined is XML because this separates the Logic from the layout definition. If also allows the definitions of different layouts. You can mix both approaches.

 Reference to resource is XML files

In XML files you can refer to other resource via the @ sign.

Activities and Life cycle

The Android system Controls the life cycle of your Application. The Android system may stop or destroy your application. Through predefined methods the Android system defines a life cycle “Activities” Important are:

  • onSaveInstanceState() – Called offer the Activity is stopped it is used to save data so that the “Activity ” Can restore its states if re-started
  • onPause()- always called if the Activity ends. Can be used to release resource or save data
  • onResume() – called if the “Activity” is restarted can be used to initialize fields.

Configuration Change

When Configuration on change happens  an Activity will be restarted. It An event which is relevant for the application is triggered configuration change occurs* for eg: if the user Changes the orientation of the device (either vertically or horizontally) Android assumes that an ‘Activity’ may wanted to use different resources for those orientations and restarts the Activity.

In the emulator you can stimulate the change of the orientation via Ctrl+F11

Restart of application can be avoided by following in case of orientation change or position of the physical keyboard.

<activity android:name=".ProgressTestActivity"
     android:label="@string/app_name"
     android:configChanges="orientation|keyboardHidden|keyboard">
</activity>

Context

The Class “android content context” provides connection between Android system and the resources of the projects. It is the interface about the application environment to the global information. The context also provides access to Android Services Activities and services extend the context class.

Button clicks in a ListView Row in Android

16 Sep

Lets say you have a spinner widget, like the one we created in our post first, and you wanted to put a button on each row of your spinner for your users to click (everyone loves clicking buttons, right?).

You might have a layout a bit like this simple one below:

<LinearLayout 
android:id="@+id/LinearLayout01"
android:layout_width="fill_parent"
android:layout_height="fill_parent"
xmlns:android="http://schemas.android.com/apk/res/android"> 
<TextView android:text="this is a row"     
android:id="@+id/tvViewRow"     
android:layout_width="wrap_content"     
android:layout_height="wrap_content"> 
</TextView> 

<Button android:text="Click me!"     
android:id="@+id/BtnToClick"     
android:layout_width="wrap_content"     
android:layout_height="wrap_content"     
android:onClick="myClickHandler"> 
</Button>

</LinearLayout>

.. Containing just a textView and a Button View.

A listView with textual, non-clickable views in it responds to Click events via the OnItemClickListener event.

But once you put a button in the ListView, this event no longer fires.

So how do you capture the button’s click event, and find what row in your ListView a clicked button is located in?

You may have noticed this android:onClick="myClickHandler">in our layout above..
What this does is tie every click of every instance of that button, in every row of our ListView to one single handler, located in the code of our ListActivity class below:

    public void myClickHandler(View v) 
    {

        //reset all the listView items background colours 
        //before we set the clicked one..

        ListView lvItems = getListView();
        for (int i=0; i < lvItems.getChildCount(); i++) 
        {
            lvItems.getChildAt(i).setBackgroundColor(Color.BLUE);        
        }

        //get the row the clicked button is in
        LinearLayout vwParentRow = (LinearLayout)v.getParent();

        TextView child = (TextView)vwParentRow.getChildAt(0);
        Button btnChild = (Button)vwParentRow.getChildAt(1);
        btnChild.setText(child.getText());
        btnChild.setText("I've been clicked!");

        int c = Color.CYAN;

        vwParentRow.setBackgroundColor(c); 
        vwParentRow.refreshDrawableState();       
    }

In this case, the View v being passed in as a parameter is our button.
We get the parent of our button, being careful to cast it as a LinearLayout (have another look at the xml if you’re not sure why), and then simply set the background colour of our Layout Row.

Don’t forget to call .refreshDrawableState(); on yourvwParentRow or it will never redraw and you won’t see your nice colour change.

.. Tada!

Update: Hi everyone, thanks for all the interest, here’s a link to the full project zipped.
Updated Update: Here’s another link, and another, andanother.

I’ve also updated the above myClickHandler to loop through the other items in the ListView and reset them to a default colour, in this case blue, to make it a bit more obvious what’s going on. Hope that helps.

Create Status Bar Notifications in Android

16 Sep

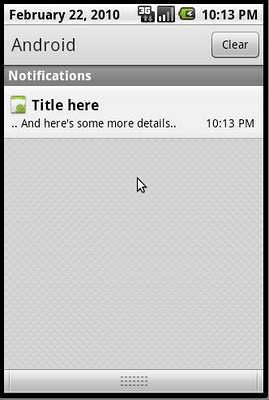
A status bar notification is used to notify the user of a system event, like an sms being received or a new device being detected, without interrupting the user from whatever other task they might be doing with their phone.

The status bar area is located at the top of the screen and the user can pull this area to expand it, and show a history of notifications.

If a Notification has been setup to include an enclosed Intent, selecting that particular notification in this expanded view can fire the Intent, taking the user to an Activity screen of the related application, or do any of the many other things that Intents can do.

You can also configure the notification to alert the user with a sound, a vibration, and flashing lights on the device.

A background Service should never launch an Activity on its own in order to receive user interaction. The Service should instead create a status bar notification that will launch the Activity when selected by the user.
A status bar notification should be used for any case in which a background Service needs to alert the user about an event.

Here is a simple method that creates and displays a notification when passed a string msg :

public void displayNotification(String msg)
{
NotificationManager manager = (NotificationManager) getSystemService(Context.NOTIFICATION_SERVICE);
Notification notification = new Notification(R.drawable.icon, msg, System.currentTimeMillis());

// The PendingIntent will launch activity if the user selects this notification
PendingIntent contentIntent = PendingIntent.getActivity(this, REQUEST_CODE, new Intent(this, ExpandNotification.class), 0);

notification.setLatestEventInfo(this, "Title here", ".. And here's some more details..", contentIntent);

manager.notify(NOTIFICATION_ID, notification);

}

.. Which you can call simply like this:


displayNotification("Hi, I'm a Statusbar Notification..");

.. Easy, isn’t it?

Your First ANDROID Application

16 Sep

Install the demo application

This application is also available on the Android Market place. To install if via the google play application you can also scan following barcode with your android Smartphone alternatively.

Create Projects

Select file –> New–> other–> Android Project and create the Android Project enter the following.

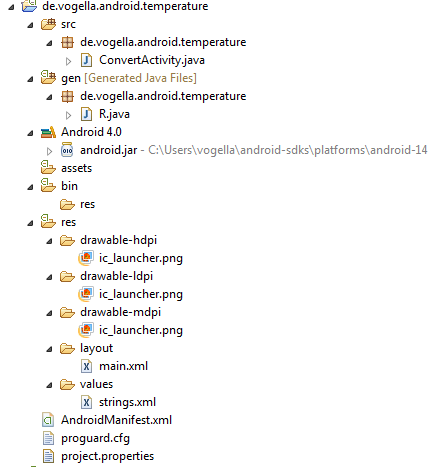
Press ‘Finish’ this should create the following directory structure.
Modifying resource

ADT provide specialized editor for resource files as described in the android Development Tools. These allows to between XML representation of file and rich user interface through tabs on the button  of the editor.

 Create attributes

Android allows you to create static attributes. These attributes can for example be used in your XML layout files or referred to via Java source code.

Select the file “res/values/string /CXML” and press the ‘Add’ button select ‘color’ and enter my color as the name and “3399CC”  as the value.


Add the following “string” attributes string attributes allow the developer to translate the application at a later point.

Table 1: String Attributes

Name Value
celsius to Celsius
fahrenheit to Fahrenheit
calc Calculate

Switch to the XML representation and validate that the values are correct.


Hello World, Convert!
Temperature Converter
#3399CC myClickHandler
to Celsius
to Fahrenheit
Calculate

Add Views

Select “res/layout/main.XML/” and open the Android editor via a double click. This editor allows you to create the layout via drag and drop or via the xml source code. You can switch between both representation via the tabs at the bottom of the editor for changing the position and grouping elements you can use the eclipse “Outline” View.

The following screenshot of the “palette” view from which you can drag and drop new user interface components into your layout. Note that the”Palette” view changes frequently so your view might be a bit different.

You will now create your new layout to remove the text object right click on the existing text object “Hello World Hello” in the layout select “delete” from the popup menu. Then from the “Palette” view select Text fields and locate “Text fields” derive from the class “Edit text” they just specify via an additional attributes which text type can be used.

Then select the Palette section “Form widgets” and drag a “Radio Group” Object onto the layout. The number of radio button added to the radio button group depends on your version of Eclipse. Make sure there are two radio buttons by deleting or adding radio buttons to the group.

From the palette section from widgets drag a button object onto the layout. The result should look as follows.

Switch to  ’main.xml’and verify that your xml looks like the following.

<?xml version=”1.0″ encoding=”utf-8″?>

<LinearLayout xmlns:android=”http://schemas.android.com/apk/res/android”

android:layout_width=”fill_parent”

android:layout_height=”fill_parent”

android:orientation=”vertical” >

<EditText

android:id=”@+id/editText1″

android:layout_width=”match_parent”

android:layout_height=”wrap_content”

android:text=”EditText” >

</EditText>

<RadioGroup

android:id=”@+id/radioGroup1″

android:layout_width=”match_parent”

android:layout_height=”wrap_content” >

<RadioButton

android:id=”@+id/radio0″

android:layout_width=”wrap_content”

android:layout_height=”wrap_content”

android:checked=”true”

android:text=”RadioButton” >

</RadioButton>

<RadioButton

android:id=”@+id/radio1″

android:layout_width=”wrap_content”

android:layout_height=”wrap_content”

android:text=”RadioButton” >

</RadioButton>

</RadioGroup>

<Button

android:id=”@+id/button1″

android:layout_width=”wrap_content”

android:layout_height=”wrap_content”

android:text=”Button” >

</Button>

</LinearLayout>

Edit View properties

You change  user interface components properties via the eclipse ‘properties’ view if you select it most of the properties can be changed via the right mouse menu you can also edit properties of field directly in xml If you know what you want you to change, changing properties in the XML file is much faster. If you are searching for a certain properties the right mouse functionality is rice.

Open your main.xml layout file the edit text control shows currently a default text you need to delete it in the xml code. Switch to the xml tab called ‘main.xml’ and delete the android:text=”EditText” property from the edit text part switch back to the Graphical layout tab and check that the text is removed.

Use the right mouse click on the first radio button to assign the “Celsius” string attribute to its “text” property Assign the “fahrenheit” string to the second radio button.

You can always either edit the xml file or modify the properties via right mouse click.

Set the property”Checked” to true for the first Radio Button.  Assign “Calc” to text property of your button and assign “myClickHandler” to the ‘on click’ property.

Set the “Input type” Property to “number signed” and “numberDecimal” on your edit text.

In  a Linear layout all your user Interface Components are contained you need to assign a background color to this “LinearLayout” Right click on an empty space in graphical layout mode then select other properties–>All by name –> Background select ‘color’ and then select ‘mycolor’ in the list which is displayed.

Switch to the main.xml tab and verify that the xml is correct.

<?xml version=”1.0″ encoding=”utf-8″?>

<LinearLayout xmlns:android=”http://schemas.android.com/apk/res/android”

android:layout_width=”fill_parent”

android:layout_height=”fill_parent”

android:background=”@color/myColor”

android:orientation=”vertical” >

<EditText

android:id=”@+id/editText1″

android:layout_width=”match_parent”

android:layout_height=”wrap_content”

android:inputType=”numberDecimal|numberSigned” >

</EditText>

<RadioGroup

android:id=”@+id/radioGroup1″

android:layout_width=”match_parent”

android:layout_height=”wrap_content” >

<RadioButton

android:id=”@+id/radio0″

android:layout_width=”wrap_content”

android:layout_height=”wrap_content”

android:checked=”true”

android:text=”@string/celsius” >

</RadioButton>

<RadioButton

android:id=”@+id/radio1″

android:layout_width=”wrap_content”

android:layout_height=”wrap_content”

android:text=”@string/fahrenheit” >

</RadioButton>

</RadioGroup>

<Button

android:id=”@+id/button1″

android:layout_width=”wrap_content”

android:layout_height=”wrap_content”

android:onClick=”myClickHandler”

android:text=”@string/calc” >

</Button>

</LinearLayout>

Change the Activity source Code

You specified that an “activity” called “convert activity” should be created during the, generation of view Android project. The project wizard created based on the ‘onclick’ property of your button.

package de.vogella.android.temperature;

import android.app.Activity;

import android.os.Bundle;

import android.view.View;

import android.widget.EditText;

import android.widget.RadioButton;

import android.widget.Toast;

public class ConvertActivity extends Activity {

private EditText text;

@Override

public void onCreate(Bundle savedInstanceState) {

super.onCreate(savedInstanceState);

setContentView(R.layout.main);

text = (EditText) findViewById(R.id.editText1);

}

// This method is called at button click because we assigned the name to the

// “On Click property” of the button

public void myClickHandler(View view) {

switch (view.getId()) {

case R.id.button1:

RadioButton celsiusButton = (RadioButton) findViewById(R.id.radio0);

RadioButton fahrenheitButton = (RadioButton) findViewById(R.id.radio1);

if (text.getText().length() == 0) {

Toast.makeText(this, “Please enter a valid number”,

Toast.LENGTH_LONG).show();

return;

}

float inputValue = Float.parseFloat(text.getText().toString());

if (celsiusButton.isChecked()) {

text.setText(String

.valueOf(convertFahrenheitToCelsius(inputValue)));

celsiusButton.setChecked(false);

fahrenheitButton.setChecked(true);

else {

text.setText(String

.valueOf(convertCelsiusToFahrenheit(inputValue)));

fahrenheitButton.setChecked(false);

celsiusButton.setChecked(true);

}

break;

}

}

// Converts to celsius

private float convertFahrenheitToCelsius(float fahrenheit) {

return ((fahrenheit – 32) * 5 / 9);

}

// Converts to fahrenheit

private float convertCelsiusToFahrenheit(float celsius) {

return ((celsius * 9) / 5) + 32;

}

} 

Start Project

To start the application select  your project right click on it and select Run–>Android application If an emulator starts up very slowly.

You should get the following result

Type in a number, select your conversion and press the button the result should be displayed and other option should get selected.

ANDROID VIRTUAL DEVICE EMULATOR

16 Sep


To run an Android system the Android Development Tools (ADT) include an emulator It Allows you to test your application without having a real device. The emulator behaves like a real device.

  • Version
  • Size of the SD card
  • The screen resolution
  • Other relevant settings

They can be defined with different Configuration. These devices are called as Android Virtual Device and you can start several in parallel.

Google vs Android AVD

You decide whether you want an Android device or a Google device during the creation of an AVD. An AVD which is created for Android will contain the programs from the Android open source project. An AVD, Which is created for the Google API’s, will contain several application and the notable one is Google Map Application.

Emulator Shortcuts

To work with emulator the following are the shortcuts.

  • “Alt+Enter” maximizes the emulator.
  • “Ctrl+F11” change the orientation of the emulator
  • “F8” Turns networks on/off ]

Performance

The native GPU of the Computer can be used by the graphics of the emulator. This will make the rendering in the emulator very fast to enable this add the GPU Emulation property to the device configuration and set it to true.

You can also get the “Enabled” flag for the snapshot. This will save the state of the emulator and will let it start much faster. And native GPU rendering  and snapshots do not work together currently.

 Hardware button

Android 4.0 introduces devices that do not have hardware any more if you want to create such AVD add the Hardware “Back/Home keys” Property to the device configuration and set it to ‘false’.

ANDROID COMPONENTS

16 Sep

A short overview of the most important Android components.

Activity

It represents the presentation layer of an Android application. It presents a screen in your application. Activity can be displayed as dialogues or can be Transparent. An Android application can have several activities.

Views and View Groups:

“Views” are user interface widgets. The base class for all the views is android .View.views has attributes which is used to configure their appearance and behaviour.

A “View Groups” is for arranging other views. They are also called as layout managers the base class for “view Groups” I android.View.viewgroup which extends the class.

In order create complex layout View Groups can be nestled. It should not too deeply nestled since has a negative impact on the performance.

Intents:

These are asynchronous message which allows application in order to request functionality from other components of the Android Systems.

Applications register themselves to intent via an Intents filter. To perform certain tasks Intents allow to combine loosely coupled Components.

Services:

Services perform background tasks without providing a user Interface can notify the user via the notification framework in Android.

Content Provider:

It provider a structured interface to application data via a content provider applications can share data from one to another. Along with content provider SQ Lite database is used in conjunction. The SQ Lite database stores the data which is accessed by content provider.

Broadcast Receiver

Broadcast receiver registers the messages and Intents In the case when specified situation happens a Broadcast receiver will get notified by the Android system.

Widgets (Home Screen)

These are interactive components used on the Android home screen. They display a kind of data and allow user to perform via then.

Other

The above listed Android components are most important some of the other Android Components are:
• Live Folders
• Live wallpapers
Live folders display data on the home screen where as Live Wallpapers Allows to create animated background..

WHAT IS ANDROID?

16 Sep

Android is an operating system which is based on Linux with Java Programming Interface.

The Android Software Development kit provides the following necessary tools for the developing the Android Applications.

  • A Compiler
  • Debugger
  • A device emulator
  • It’s own virtual  Machine to run Android Programs

Android is primarily developed by Google It Allows:

  • Background Processing
  • Provides a rich user Interface library
  • Supports 2-D and 3-D Graphics using the Open GL Libraries
  • Access to the file system
  • An embedded SQLite database

Android Application can re-use components of other applications using its different components.

Google Play (Android Market)

Google Play service is offered by Google in which programmers can offer their Android application to Android users. Google play application which is included in Google phones allows installing application. Google play also offers an update service. Google play is used to be called as Android Market.

Security and Permissions:

On an Android device, the Android system will create a unique user and group ID for every application during the development each application file cannot be accessed by anyone else except the generated user. Each application will be started is its own process. Every Android application is isolated from other running application by means of the underlying Linux Operating System. If the data is to be shared it is done is a service or Content provider.

Android also contains Permission systems. It predefines every application but can define additional permissions. An android application declares permission in its AndroidManifest.xml configuration file Permission has different levels. Some are automatically granted or rejected by the system permission will be presented before installing the application. If user denies permission application can never installed. The check of permission is done through installation permissions can neither be denied nor be granted after the installation.

All the users do not pay any attention to the permissions only few of them do and even give negative reviews on Google Play.